In a previous article “Getting Started with Playwright for Automation Testing” we discussed an easy way to start with automation testing and all needed adjustments during installation. Today, we will continue this topic and dive into the PlayWrite tool more deeply and learn more about it with examples of testing video streaming application. You can find all the example code below and can in your own projects or test-suites.
Quick Guide: What to expect in this practice article:
- Short guide for PlayWright and IDE (Visual Studio Code) Setup: We’ll start by installing the IDE, Visual Studio Code, which serves our digital workspace.
- Test case decision analysis: explanations of the approaches used.
- Working with dates in JavaScript: will use the “Date” object and functions getMinutes/setMinutes/addMinutes (or their UTC-options: getUTCMinutes/setUTCMinutes/addUTCMinutes).
- Authentication: will consider various types of usage.
- Test urls: we will clarify how that works.
- Using various browser contexts in one test case: we will understand and clarify how this works.
- Test Run: Finally, we’ll run tests to see everything in action.
Let’s start!
1. Test setup
1.1 Install IDE.
1.2 Install Node.js (or npm, if you need specific versions of node for another of your projects).
1.3 Install Playwright.
For more information please see our detailed guide.
2. Test-case analysis and execution details
2.1 Full code of test case.
|
test(‘testCreateFullEvent’, async({request}) => { |
2.2 Preconditions.
2.2.1 Some of the constants we defined previously (like “apiKey”, “authorizationToken”, “RSAPrivateKey”), because of course it is confidential information for API access.
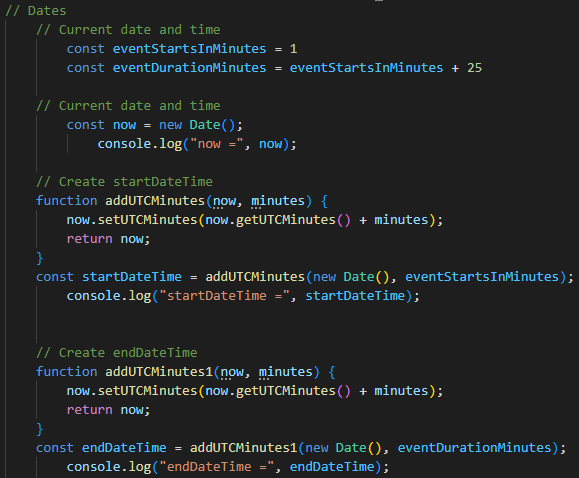
2.3 Dates.
2.3.1 To get the current day and time in JavaScript, we used the built-in “Date” object. For our test-case at first we need to define main dates for next usage.
2.3.2 For our example we defined that our event started in 1 minute from the current date (“eventStartsInMinutes”) and the event ended 25 minutes after start (“eventDurationMinutes”).
2.3.3 Then we define “now” as equivalent to the current date and time.
2.3.4 In the next similar steps we are working on adding minutes to our already existing current date (“now”).
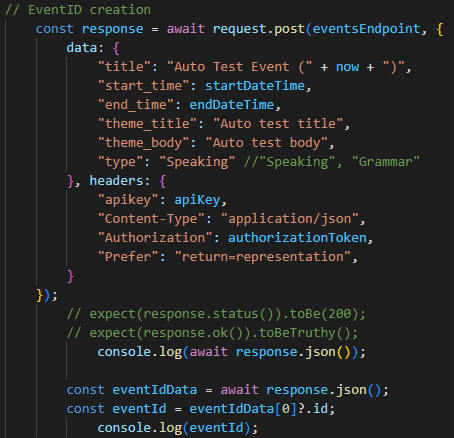
2.4 EventID creation.
EventID was created via POST-request (“.post”) to “eventsEndpoint” with request information “data” and “headers” according to the data scheme.
2.4.1 “.post” – its built request method.
2.4.2 “eventsEndpoint” – endpoint (or url in other words) for actions with events.
2.4.3 “data” includes main info about the entity, which we want to create – like title, start date, end date, type of event etc.
2.4.4 “header” includes main info for authorization to access to eventID create endpoint – “apiKey” and “authorizationToken”.
2.4.5 At the next step we check the status code and status of our response.
2.4.6 Finally we processed the received date from response and separate from .json needed “EventID” field.
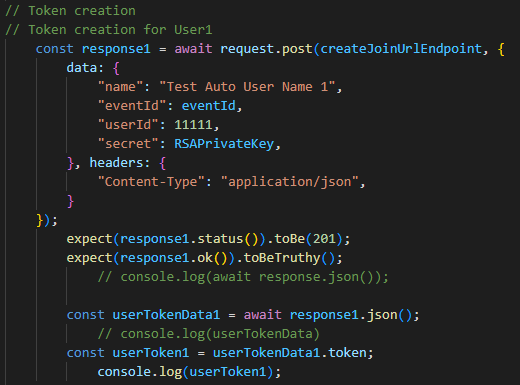
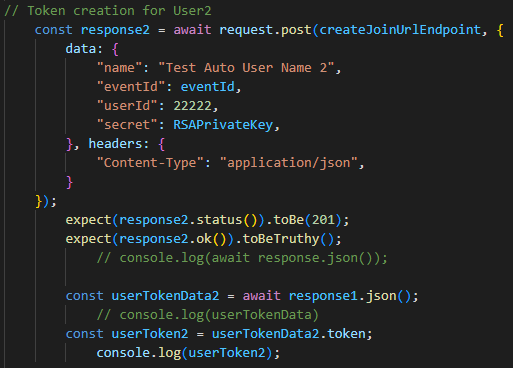
2.5 Token creation.
UserToken we created via POST-request (“.post”) to “tokenCreationEndpoint” with request information “data” and “headers” according to the data scheme.
2.5.1 “Data” includes main info about the entity, which we want to create – like “name”, “eventID”, “userID”, “secret” key etc.
2.5.2 “Header” includes only the main info about the type of content.
2.5.3 Finally we processed the received date from response and separate from .json needed “UserToken1” and “UserToken2” fields.
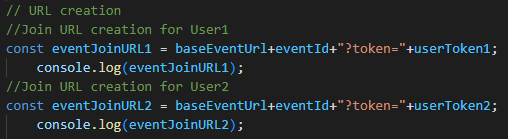
2.6 URL creation.
Event join url consist of main parts, which we need to gather in this step:
2.6.1 base url part: “https://example.web.app/event/”
2.6.2 event ID part: “4a8453b2a-346a-41e4-9gdg-f4ffdhhdr3a5” (hash event ID example)
2.6.3 user token part: “dfEfl352435Kdllehs98iklsxEhgQofYtGier3gsdggkoum884okIJfglKJHEFL” (user token example)
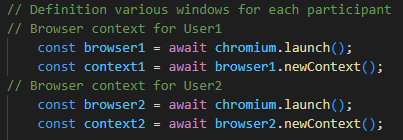
2.7 Definition of separate windows for each participant.
Here, we utilize various contexts and browsers to simulate actions of different users, keeping them separate from each other.
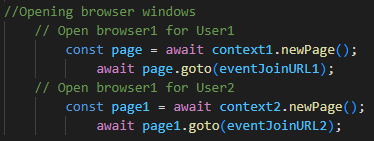
2.8 Opening browser windows.
Separate windows for each user, simulating opening application by various users.
3. Test Run.
Lets run the test by usual command “npx playwright test -g “test-case name example” –headed”, where:
3.1 “npx playwright test -g” – command for running our test.
3.2 “test-case name example” – the name of the runned test.
3.3 “–headed” – browser mode.
Conclusion
In this article, attention is given to practice and I have described in some detail how one of the positive tests works. This is only a small part of the automated tests that are carried out on our project (an educational platform with audio and video communication between students), among which are API tests. Of course, the minimum set of tests covers all the basic functionality of the application and expands in terms of feature priority and product development.
If you require a more comprehensive solution for integrating with your existing or future applications, feel free to contact us for detailed information and services.